
.png)
EASY KNIT CHUNKY CUSHION COVER TUTORIAL
- Wendy Orlando
- Sep 29, 2022
- 6 min read

Updated: May 19

Are you bored with your decor but don’t have the cash to splash on designer cushions? Can you knit? Well…. what are you waiting for?
Here at The Crafty Co, we have the perfect project that will spruce up your space in no time at all.
These knitted cushion covers work up really quick as they are made from multiple strands and a large set of needles.
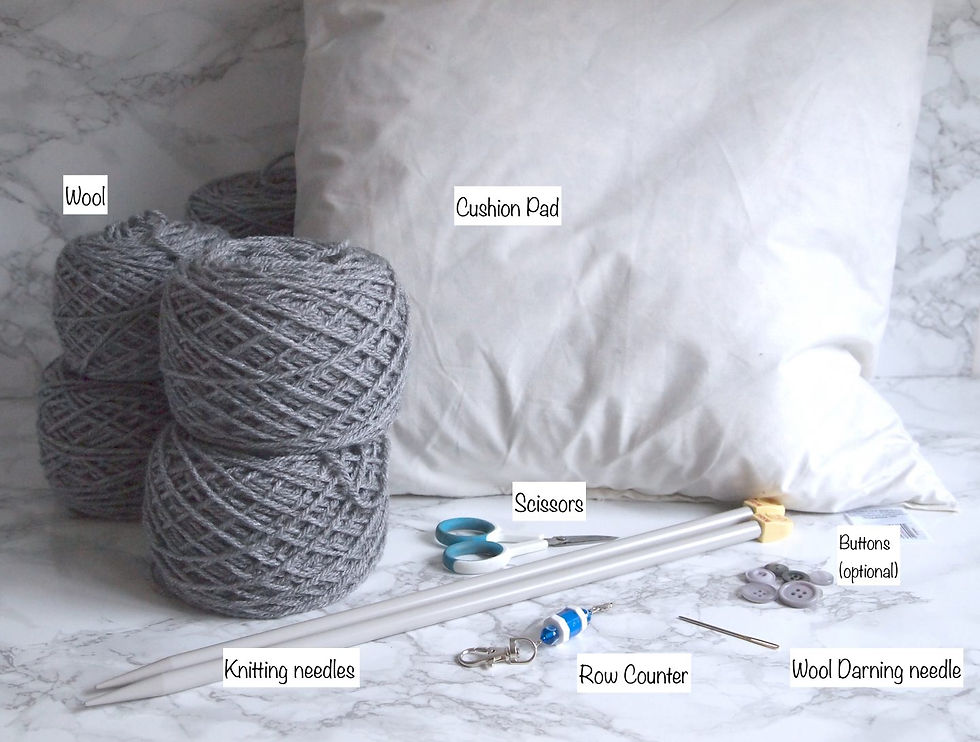
HERE’S WHAT YOU NEED TO MAKE A KNITTED CUSHION COVER
Wool (It doesn’t matter what thickness or type as anything goes)
10mm Knitting Needles (they will need to be long needles as the wool is thick and wide)
Wool darning needle – to sew in ends
Cushion Pad
Buttons (optional, only needed if you want to make the cover removable)
scissors
row counter (optional)
STITCHES
knit stitch = hold the needles in the starting position, push the tip of the right needle into the first loop on the left needle, wrap the yarn around the right needle, pull the right needle through the loop, pull the loop off the left needle
increase stitch (this video explains the increase stitch) CLICK HERE TO WATCH
decrease stitch (CLICK HERE FOR DECREASE STITCH)
HOW YOU MAKE A KNITTED CUSHION COVER
Before you begin it’s a good idea to wind your wool into balls or cakes. We love using cakes and they are so easy to make. Winders are available and make light work of turning your ball into a yarn cake. The advantage of working with these is that the strand is pulled from the centre while keeping the wool stable without it rolling about all over the place. This is important when you are working with multiple strands at the same time as they snag around each other and you spend all your time trying to unravel a mess. Balls are fine too and a top tip is to keep them in separate containers, to again stop them rolling about and getting tangled. We are using Aran weight wool and three strands together. If you are using double knit wool, start off with four strands.
One final thing before we begin is tension. It’s not really important for this project as you make the cover to fit your cushion pad. Having said that it is important to keep an even tension throughout so that the stitches look nice and uniform. When working with lots of strands smooth them as you go so there are no kinks. If they are uneven it will make your project look messy.

With your 3 or 4 strands (depending on the weight of yarn) make a slip knot.

Using 10mm needles, cast on 3 stitches.

This cover is made on the diagonal and to achieve this look we increase each row to form a triangle shape. It’s easy to do but looks more stylish than working back and forth in long rows.
1st Row – knit into the first stitch. Try to keep this stitch fairly tight on the needle or you will get uneven sides. Increase into the 2nd stitch. If you want to see how, follow the method HERE
then knit the last stitch. You will now have 4 stitches on your needles.

The first row is now complete.

The 2nd and all increase rows are worked the same, so to recap:
Knit the 1st stitch, increase in the 2nd stitch, then knit to end. You will notice that we only work the increase at the beginning of the row. This gives us a nice even triangle with a 90-degree corner that is perfect for square covers.
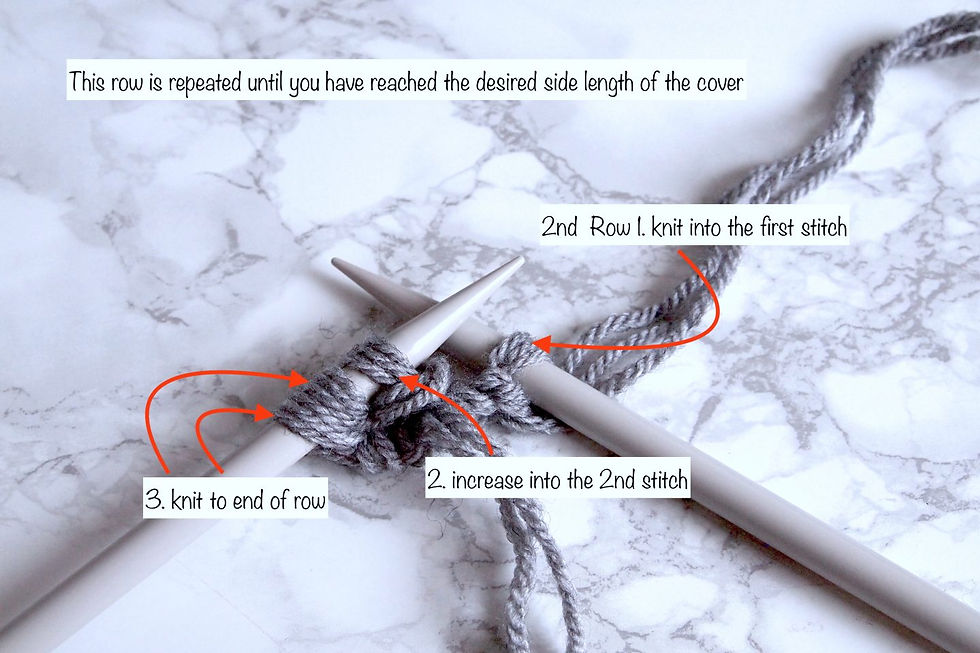
Row 2 is now complete and you will see that we have increased one more stitch and you should have a total of 5 stitches on your needle.

Continue working the increase on the 2nd stitch of every row. Increasing on this stitch creates a nice border on your work and it will make it much easier when we come to sew the sides together.

You may have noticed that when you get to the last 3 stitches, the two indicated in the picture below seem tighter than all the others. This is because they are the increase stitch from the row before. As you turned one stitch into two it will be naturally tighter than the others along the row. It will make no difference to the finished look of the cover.

A top tip when working with multiple strands is to release the strands from the ball or cakes before you knit them. Pull them out at the same time and smooth the strands out. Don’t be tempted to pull metres and metres out as they will end up all tangled and be time-consuming to unravel. Little and often is the way to go with this. Do be careful though if you have children or pets around as they may run around and get caught unravelling all your hard work as they go.

Keep working the increase row until you reach the desired size. Check your progress regularly so that you don’t do too many rows and have to unpick. A point to note is that wool will stretch over time so it’s best to make the cover slightly smaller to allow for this. We placed our cover over the cushion inner in the centre and measured how far we were from the edge of the inner. We like a plump firm cushion so we stopped when our cover was 2 inches from the edge. Our tension is fairly loose so there was a nice bit of give in our cover. You will need to gauge your tension and decide if you want a loose or tight cover.

Once you are happy with the size, knit one row.

It is now time to shape the cover into a square by decreasing to the end. The decrease row is the same for each row. Knit the 1st stitch. As you did for the rest of the cover, keep this stitch fairly tight.

Decrease in the 2nd and 3rd stitch. Insert your needle from left to right in these two stitches. Insert in the 3rd stitch first and then pick up the 2nd stitch next. If you want to recap how to do it, watch it

Wrap the yarn around the needle, pull stitches 2 and 3 over the needle and slide the stitch onto the right needle. Knit the remainder of the stitches in the row.

Keep decreasing until you only have 3 stitches left.

Cast off the 3 stitches knitwise, break off yarn and pull through to secure.

Make the 2nd panel in exactly the same way.

To assemble the cover, you will be sewing around the edge. First weave in all your ends. The cover remains the same way out so choose the side you like best and have them showing. You have the choice to have the rows going in the same or opposite directions. It’s your design so go for the look you like best.

Line up the sides so that the row ends match. As we knitted the first stitch in each row it is easy to line them up. You will see that there are raised stitches and in between stitches on each edge. Sew in a raised stitched and then an in-between stitch then a raised and so on along one of the edges. Below we are sewing an in-between stitch.

Here we are sewing a raised stitch.

Sew three of the edges, leaving the fourth open to insert the cushion inner. If you are using a washable inner, once inserted you can sew the last side up to complete your cushion.

If you want the cover to be removable it’s a good idea to add buttons or poppers. To make the corners neat and hide the cushion, sew up a few inches each side of the fouth side. Make sure that you are still able to insert the inner before adding the buttons.

Sew the buttons at regular intervals along the gap. The buttonholes are created from the gaps in the stitches on the other panel so it’s a good idea to check the size before you sew them on. They are better being slightly bigger than needed so they don’t pop undone.

To finish the cover, line up the other side and stretch the stitches over the buttons. You can use up all your odd buttons if you like. They don’t have to match.

Your cover is now complete and doesn’t it look gorgeous?

You can make them in any colour you like or how about using up all your oddments and make a rainbow random cover.

So dust off your needles, grab your supplies and get creating.
We love seeing your creations so don’t forget to tag us in your makes #CraftyCoCreations
Happy knitting
The Crafty Co
x
Comments