
EASY UP-CYCLED BOOK TUTORIAL
- Wendy Orlando
- Sep 14, 2023
- 6 min read


We all have them, don’t we? Books and annuals that we’ve read, but can’t bear to part with. Why not turn them into something useful and have fun in the process.
If you don’t want to recycle your own books, you can find really cheap ones in book stores or charity shops.
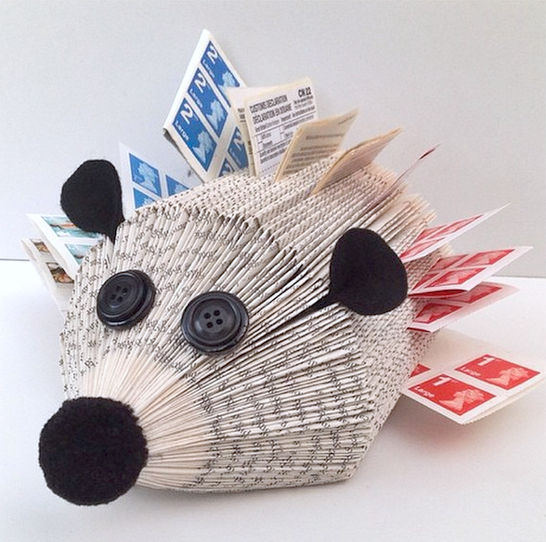
These super cute up-cycled book animals would make a fab project for a cold or rainy afternoon.
A little bit of time and patience and you will end up with a really useful note or pen holder.
PLEASE NOTE THAT THESE ARE NOT SUITABLE FOR SMALL CHILDREN DUE TO SMALL PARTS
If you fancy having a go at making one, below is a step-by-step picture tutorial.
HERE’S WHAT YOU NEED!
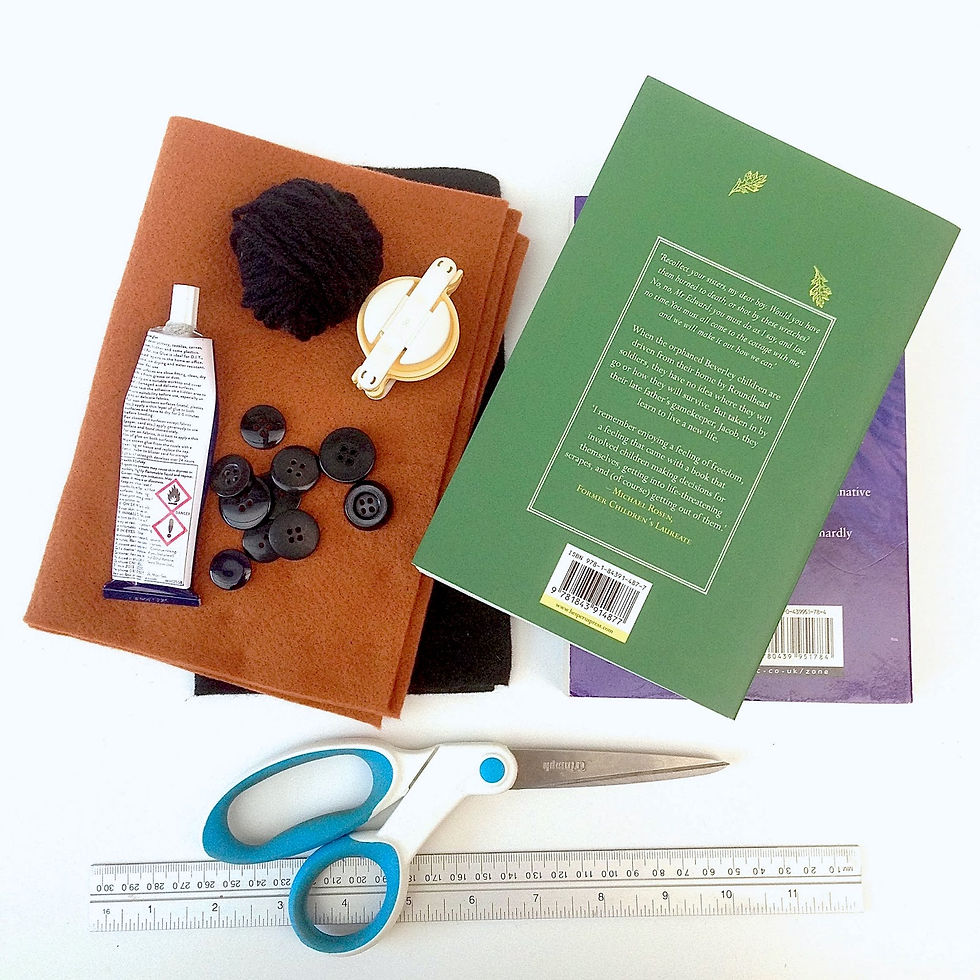
old books (approx 300 pages)
a ruler
scissors
buttons
pom poms
glue
felt or you could use card
Not essential, but if you would like to add a base, you will also need
Cardboard or heavy weight card
large elastic band

And if you would like to make the pen holder you will also need:
Pens (preferably the ones you would like to put in the finished holder)
Coloured card
Tape

HERE’S WHAT YOU DO: BASIC ANIMAL

Carefully remove the front and back covers.

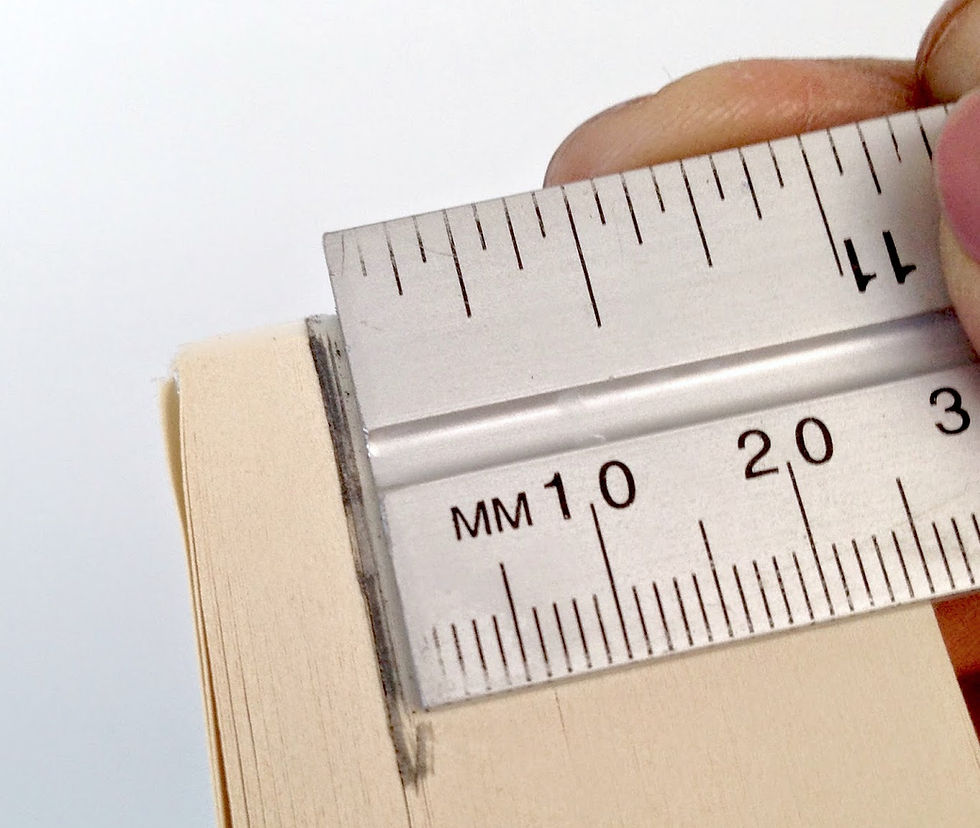
Stand the book up and measure 2.5cm and mark with a pencil.
STARTING FROM THE LEFT, REMOVE THE UNWANTED BOOK PAGES CAREFULLY.

Cut away the excess part of the spine. Making sure that you don’t cut into any of the pages, as they will fall away as you start to fold.

Lay the book flat, and with the spine at the bottom. Fold the top right corner down as indicated below, and run your finger down the crease.

Then, fold the top of the page downwards so that it meets the line across the spine. Run your finger across the fold to make a nice sharp crease.

Move the page down and out of the way and do the next one in the same way.

AND THE NEXT, AND THE NEXT AND YOU’VE GOT IT…….THE NEXT.

Once it becomes awkward to fold it, turn the book round so that the spine is to the right.

By now you will understand the folding process. It makes it a bit easier if you fold into the spine, tucking the edge of the page in.

Do the 2nd fold as normal, but again it’s easier to tuck in from this angle.

Keep going until you have got a nice compact shape. The more pages you do, the tighter it will be between the pages, and the firmer they will hold the things you place in them.
Once the shape starts to lift up when you place it on a flat surface, it’s time to stop.
Now you need to carefully remove the pages that you don’t need.

YOU WILL NOW HAVE SOMETHING THAT SHOULD LOOK LIKE THIS.

This part is not essential, but personally we think it finishes the project off nicely. Lay your animal down on a piece of cardboard or heavy weight card and draw round the outside of the base shape with a pencil

Cut it out making sure that you cut inside the pencil line (it is better to have the cardboard base a bit smaller and not show). Cover with a generous amount of glue.

Place the animal down on top of it, and press down firmly, taking care not to squash the pages. Turn it over and wrap a couple of elastic bands around it for a few minutes, to make sure the glue sets firm.

Remove the bands and you now have the base of your animal finished. Now comes the fun bit where you decide what animal you would like to make

We’re making a dog, but you can make anything.
To make the ears, fold a piece of felt in half and lightly draw the shape of the ear in pencil. Cut out the shape cutting through the two pieces at the same time. This will ensure that the two ears will match

ONCE YOU HAVE CUT THEM OUT, TURN ONE OF THEM OVER SO THEY WILL MIRROR EACH OTHER.
Place them in the book but at this stage don’t glue them in – just in case you change your mind. Using a strong glue, fix two white buttons to the sloping edge.

To make them look like eyes, fix two smaller black buttons in the centre of each of the white ones.

Make a pom pom and carefully cut away at one side to make it flat, as it will be easier to attach to the front. Make sure you don’t cut too far down or your pom pom will fall apart.

Attach it to the front and secure it with an elastic band, just until it dries. Make sure that you now glue the ears securely in the desired position.

Once it’s set, remove the band and admire your handiwork. To make the pen holder, the instructions are the same as the basic animal but it is best to use a book with much thicker pages. Picture story books are great and they add a bit of colour to the animal.
This book had 46 pages and is just about the right amount.
THIS IS THE BACK VIEW AND AS YOU WILL SEE, THE SPACES BETWEEN THE FOLDED PAGES ARE MUCH BIGGER.

Find the middle page and push the two sides flat so that there are the same amount of pages on each side.

The next part will be different for everyone as it depends what book you have used. The general rule is you need to make tubes for the pens to sit in. In the picture below we have made template for our tubes. This crayon was bigger than the barrel of the widest pen, however it wasn’t quite fat enough. We wrapped and secured a piece of card around it. We then measured the depth of the pages and cut lots of pieces of black card in order to make the tubes.

The depth of my pages were 8cm, and we cut our tubes 6cm deep by 10cm long. The tubes should be about 2cm shorter than your pages to allow for the width of the tubes pulling the pages apart.
Wrap the cardboard around the crayon and secure with glue. Don’t wrap it too tight as you may not be able to slide the tube back off.

YOU WILL NOW HAVE A PERFECTLY FORMED TUBE.

Make lots more and then you can start to join them.

Lay some along the page and see how many you will need in your row. We calculated that we would need 7 in each of our rows.

Secure the tubes in a row along one side. This will be hidden once glued in – you can use clear tape, but masking tape works well too.

CHECK TO SEE IF THE TUBES WILL FIT BEFORE CARRYING ON.
You now need to tape two pages together and the first one you do is the centre one that you found earlier. Place tape down the centre angled part of one page and down the back of the same page. Join it together with the next one.

This creates a pocket and you can now pop the tubes in and secure with strong glue. You may need to place pegs to hold in place until the glue sets.

Make two more pockets either side of the centre pocket so there are five in total.

You now need to cover up the tape that you put on the edges of the pocket. To do this, fold a spare page in half and cut a strip that is slightly wider than the tape so that is covers it completely. Taper one end with a 45 degree angle that will allow for the fold at the nose.

GLUE THE STRIP TO THE FRONT AND BACK EDGES TO COVER THE TAPE.

Now all you need to do is add the eyes and nose and fill it with your favourite pens and pencils. Why stop there with animals – there are all sorts of wonderful things you could make…
How about using an old annual of a favourite football team and create a desk tidy:

When you remove the cover, if you take extra care, you can use this for the base of your tidy. As the pages are nice and thick in glossy annuals, you won’t need to use so many pages and they make a really sturdy holder for the tubes to go in.
Complete the first part of the fold as per instructions for basic animal.

Then do the same for the other edge of the page folding into down into the centre of the book.

Then just fold the top point of the page downwards and crease along the fold. You don’t need to go right into the centre of the spine but make sure you do all the pages roughly the same or it will look uneven. The double fold makes the page really thick so that’s why you don’t want to tuck the point right in at the spine.

For the ruler holder, we covered a cardboard sweet tube with a page that had a picture and stuck the tube firmly in position. Make sure that you place it somewhere that will not be in the way of any of the pens once they are placed in their tube.
OR HOW ABOUT MAKING A ROCKET TO HOLD YOUR MEMO’S AND IMPORTANT NOTES:

These ones are super easy. Use the basic animal instructions and then just add a base. We used a mixture of craft foam and cardboard and you can let your imagination go wild. How about a plane or a train.
Go on ……. have a go.
We hope you have as much fun making your book animals and we love seeing your creations and makes, so don’t forget to tag us #CraftyCoCreations
Have fun
Happy Crafting
The Crafty Co
x


Comments