
.png)
QUILT TAB HANGER TUTORIAL
- Wendy Orlando
- Oct 10, 2022
- 3 min read

Updated: May 19

Whilst the weather is warm, you might not be thinking about Christmas. That’s understandable! But, before you know it the cold weather will have crept in, the nights will be getting shorter and festive lights will start popping up all over the place. It will come round before you know it. It happens every year.
THIS YEAR, YOU CAN BE PREPARED.
If you caught us on Sewing Street, you would have seen us creating this beautiful advent calendar. We had so much fun creating it and there were lots of helpful sewing tips included throughout. What you didn’t get to see though, is how to attach it to the wall and that’s where this helpful little blog comes in.
Below you will find a step-by-step guide on how to take a beautiful piece of craft and make it a feature to your wall. It’s super easy to do and can be applied to many, many craft products!
HERE’S WHAT YOU NEED
Tab top panel
Garden twine/jute
scissors
strong glue
Pencil
tape measure
hacksaw
doweling
sandpaper

HERE’S WHAT YOU DO
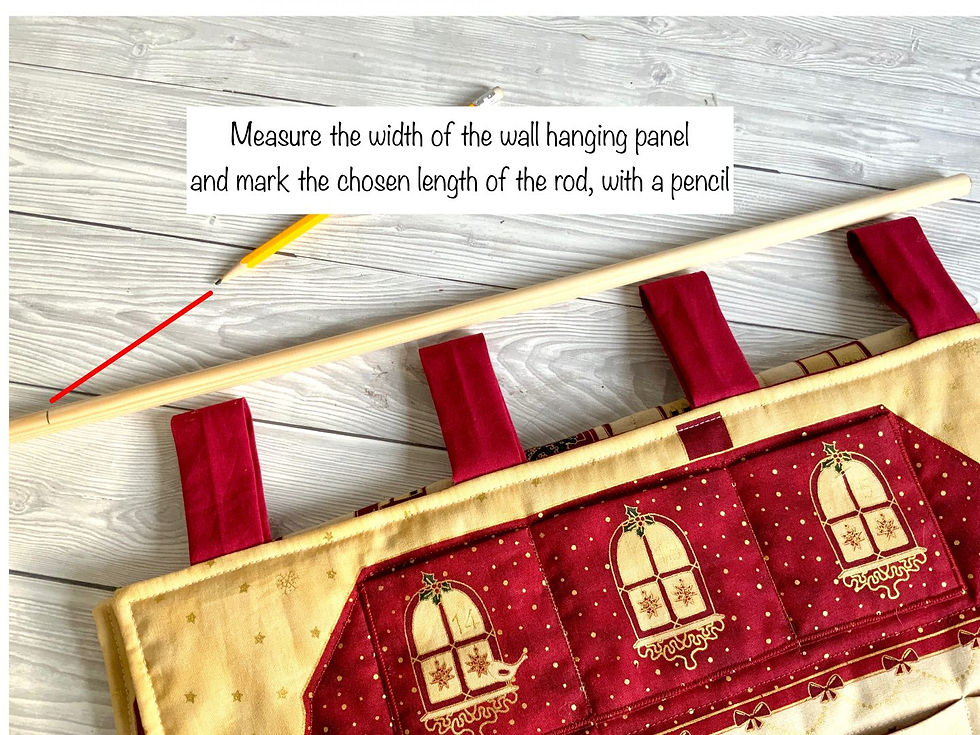
The first thing, is decide how wide you want the finished hanging to be. You also need to take the weight of your panel into consideration and make sure you use the right thickness of rod and the twine. You may have to use more than one strand of twine, but your local DIY centre will be able to give you advice .
The rod will need to be at least two inches wider at each end than the two outer tabs. This allows room for the garden twine.
Lay your tab top panel and doweling down on a flat surface and measure.
Mark the width on the rod with a pencil.
THIS STEP MUST BE DONE BY A RESPONSIBLE ADULT
Using a hacksaw, cut the rod to the desired length. It’s a good idea to sand the ends so that they are nice and smooth. You don’t want to get splinters from sharp edges. Sandpaper is graded by how course it is. The higher the number grade, the smoother the finish you will get. Anything grade 120 upwards is good. Check your local DIY centre for advice if you are unsure. They may also be able to cut the length you require if you don’t have the right tools. You will still need to sand the ends though.

Once you have cut the dowel to the length you want, mark both ends, about an inch and a half back. You will be adding the twine to this section. Not only does it give a rustic look, it will stop the hanging twine slipping along the rod.

YOU NOW ADD THE GARDEN TWINE.
It will be easier if you add a bit of glue and twine at a time. Start by adding a small amount of glue to the end of the rod.

Starting right at the end, wrap a length of twine around the rod. You may need to hold the end down for a few seconds while the glue starts to set. Wind the twine tightly around the rod, moving towards the centre. Make sure that you keep the strands as close as you can to each other. Cover all the glue.

Add a bit more glue, remember a little at a time is best to reduce the mess.

Again cover the glue, winding the twine tight.

KEEP ADDING THE GLUE AND TWINE UNTIL YOU HAVE REACHED THE PENCIL MARK.
Cut the end of the twine and tease open to reveal the individual strands. This will make it easier to stick the twine down.

Glue the end and smooth it down, placing it over the previous round of twine. Again you may need to hold it in place for a while so that it sticks. If you need to add a dab of glue on the top you can, it will dry clear and won’t show.

Do the same for the other end.

The next step is a personal choice. You can make the hanging strand as long or short as you like. With a new length of twine (it’s a good idea to not cut the length yet, and leave it attached to the ball) tie a double knot in the centre of the twine you added at the end. Tie it as firmly as you can and cut off any excess at the loose end.

Before tying the other end, thread the panel onto the rod.

Finally, tie a double knot at the other side and cut off any excess twine.

You can now pop your wall hanging up for everyone to admire.
This really does showcase your quilts or toppers and is really quick and easy.
We love seeing your creations and makes, so don’t forget to tag us #CraftyCoCreations
Happy crafting
The Crafty Co
X


Comments