
.png)
BATH MAT CUSHION COVER TUTORIAL
- Wendy Orlando
- Oct 29, 2022
- 6 min read

Updated: May 19

Do you love fashion and design but sadly can’t afford the price tag that some trends command? With fashion moving so quick, it’s no surprise that we struggle to keep up with all the trends. It doesn’t have to cost a fortune though. You can make subtle cost effective changes to your home that will completely transform your spaces.
CUSHIONS ARE A FAB EXAMPLE OF THIS.
If your sofa is looking a little tired and drab, there’s no need to banish it to the tip. An inexpensive throw and some new cushions will give it a fresh new look for a fraction of the cost of replacing it.
Now…… we wouldn’t be The Crafty Co if we didn’t take things that one step further. These gorgeous tactile cushions started off life as bath mats. With a bit of re-designing they have been transformed into on trend stylish cushions. They are cheap to make and the great thing about these, are they are totally unique to you. Bath mats come in a range of colours so you are sure to find a colour that will match or compliment your decor.
PLEASE NOTE NOT ALL MATS ARE SUITABLE FOR THIS PROJECT.
You will need to look on the back of the mat to see how the bobbles have been formed. If they have been stitched on in rows you may be able to use the mat.

HERE’S WHAT YOU NEED
cushion pad
sewing thread
scissors (large for cutting the mat, small for removing the binding)
ruler/tape measure
clips
zip
marker pen (optional)
bath mats
HERE’S WHAT YOU DO
The first thing you need to do, is remove any binding that is around the edge of the mat. We need to create a flat edge so that it is easier to sew the cover together. A small pair of scissors or an unpicker is the best tool for this job. Try not to damage the edges of the mat as they will fray and become uneven.

We made three different size covers. The small and the medium covers were made from one bath mat for each, with both sides being constructed from one bath mat. The larger cover was made from one mat too, but we used a contrasting material for the back of the cover to save money. You can of course make your cover how you want and can use 2 mats for one cover if you like. We felt it was an unnecessary cost as we wanted to keep our spend to a minimum.
Measure your cushion pad. We like a tight fit for our covers, so added a 1.5cm allowance for each side. Our pad measures 28cms so we cut our panel 31cms – that was an extra 3cms (1.5cms for each side) If you are unsure of the fit, allow a wider seam. You can always sew another row of stitching to make it smaller, however you won’t be able to add material on if you wanted it looser.

CUT THE MAT TO THE LENGTH AND WIDTH YOU WANT.
If the bobble falls in the middle of the measurement, go to the next space so it’s fractionally bigger. Using sharp scissors (adult supervision required) cut along the mat in between the bobbles. Try and keep as straight as you can to keep your panel neat.

THE EDGES OF THE MAT ARE TOO THICK FOR THE MACHINE SO WE NEED TO GET THEM READY FOR SEWING.

TRY NOT TO TOUCH THE RAW EDGE OF THE MAT TOO MUCH AS IT WILL FRAY.
You need to remove two rows of the bobbles from each side, to create a nice flat surface for sewing. Carefully snip the bobbles at their base, making sure you don’t catch the mat itself. The closer you can cut, the easier the bobbles will come out. When you look at the reverse of the mat, you will see that the bobbles are stitched in rows. Two of the sides will come out easily and the other two need to be tidied up before you sew.

Once you have cut off the top of your bobbles, it will look messy, but don’t worry, we’ll tidy it up now.

Turn the mat over so that back of the mat is showing and gently tease out the bobbles. If they being a bit stubborn, you may need to turn the mat back over and cut the bobble again.

Once you have pulled the two rows of bobbles through, turn your mat over and it should look like the picture below.

The back here still looks a bit messy as we were cutting the vertical bobbles. Trim the ends back, making sure you don’t cut through the next row of bobbles that are still attached to the mat.

As you can see below, the edge has been tidied up and will be much easier to sew.

The horizontal bobbles are easier to remove and leave a neater finish.

TO STOP THE RAW EDGES FRAYING, OVERLOCK OR SEW A ZIG ZAG STITCH ON ALL FOUR SIDES OF EACH PANEL.
If you don’t do this, then the seams of the cover will eventually come undone and split.

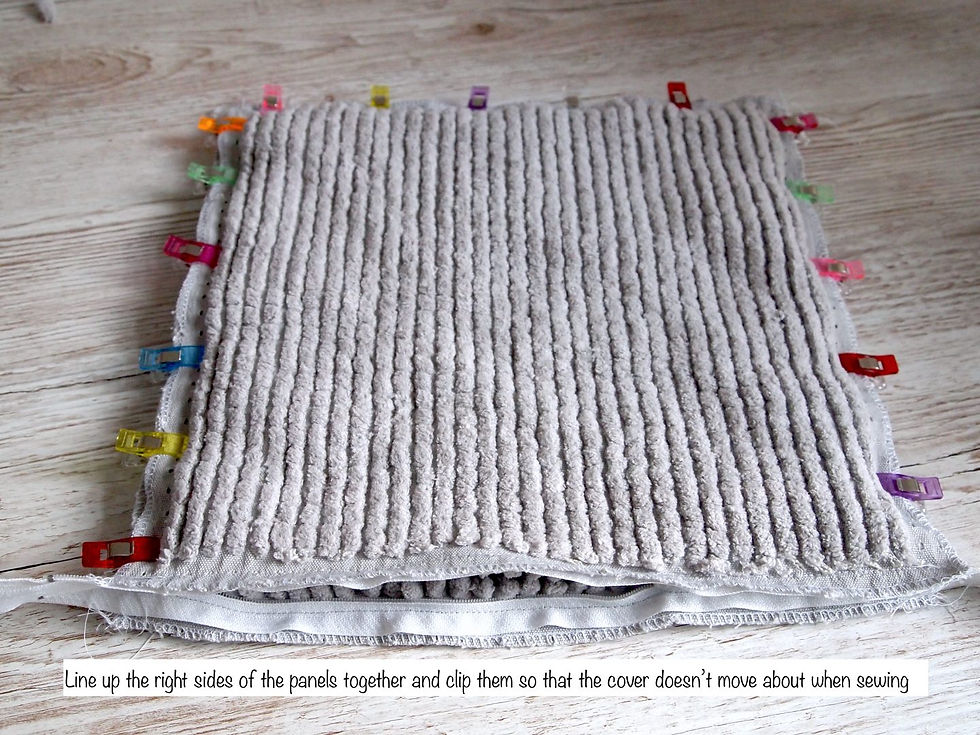
Once you have secured the stitches around the edges, you are ready to make your cover. The right sides of the cover are sewn facing each, but first we need to add a zip so that the cover can be removed for washing.

When inserting a zip in a cushion cover, it is much easier if the zip is longer than the width of the panel. You can use a smaller zip if you prefer, but we have found this method gives a much neater finish to the cover and looks more professional. Place one side of the zip so that the right side of the zip and panel are facing each other. Clip the zip to the panel to hold it in place.

Now, we don’t want to lie, this bit is fairly tricky and you could do with another hand here. You need to sew the zip teeth as close to the bobble as you can get. This will ensure that the holes that appeared when you removed the two rows won’t show. It’s not essential so don’t worry if you’re a bit wary of sewing so close (you may catch the bobble and have to undo all your hard work) As the zip is at the bottom of the cover the holes won’t really show anyway.

ONCE YOU HAVE SEWN THE FIRST SIDE OF THE ZIP, YOU NEED TO ATTACH THE SECOND SIDE TO THE OTHER PANEL.
When you offer the panel to the zip, make sure that the two panels line up. You may find it easier to draw a straight line on the zip at the edge of the first panel. This way you can place the edge of the 2nd panel on the mark.

Sew the zip to the 2nd panel and yours should look the picture below. This is the view on the reverse side of the fabric.

THIS IS WHAT IT SHOULD LOOK LIKE ON THE RIGHT SIDE OF THE FABRIC.

Before you finish your cover, make sure that you pull the zipper back to open it. It will make it easier to turn the cover the right way once sewn. The main advantage is that you don’t leave the zipper at the end, as once sewn, you won’t be able to open the cover at all.

With the zip in place, line up the two panels and secure in place with clips or pins.
You now need to close the remaining three sides. Remove the clips as you go and carefully tease the bobbles out of the way so that you don’t run over them. You are trying to sew as close the the base of the bobble as you can to get a hidden seam. Again, this is not essential, so don’t worry too much if there is a slight gap between the stitching and bobble. Make sure that you get your fingers well out of the way before you sew down the seam.

ONCE YOU HAVE SEWN THESE THREE SIDES YOU CAN TRIM OFF ANY EXCESS ZIP THAT MAY BE STICKING OUT.

Cut it off in line with the edge of the cover and dont’ use your best scissors for this or you will blunt them.

Turn your cover right side out and insert your pad. You can now sit back with a cuppa and admire your work.

The picture below shows the side of the cover. There is a seam in there, but as you can see, it has been disguised as we sewed right up to bobbles.
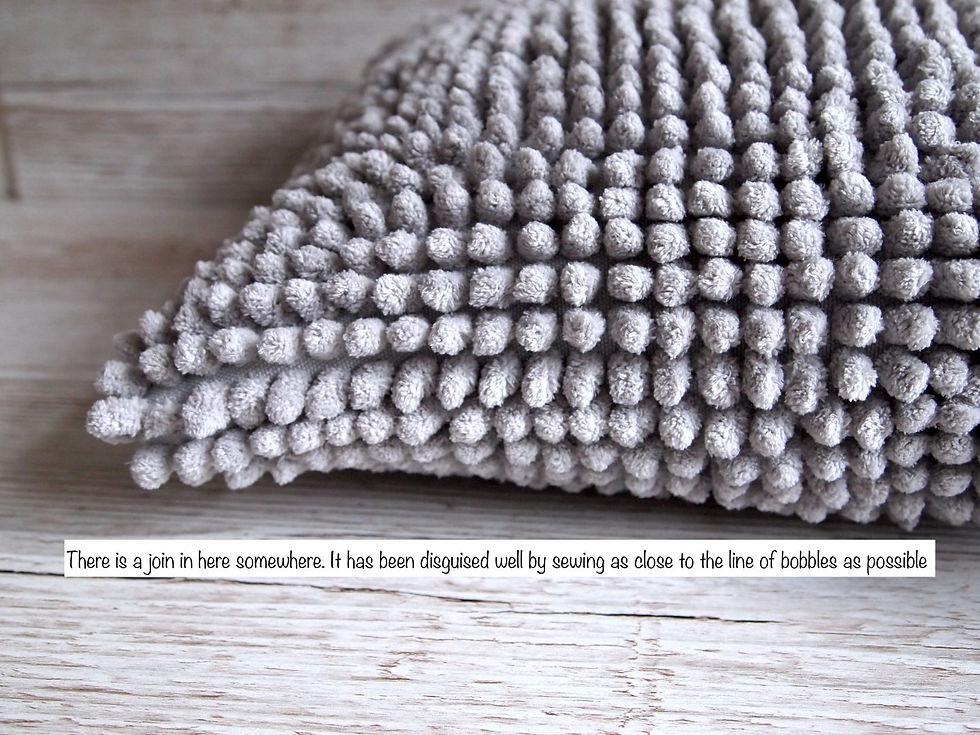
The holes have been hidden too as we were able to sew close to the bobbles along the zip edge.

This is a fab way to add your own taste and personality to your home.
We love seeing your creations and makes, so don’t forget to tag us #CraftyCoCreations
Happy sewing
The Crafty Co
X


Comments